Posts

Showing posts from May, 2013

Configure Failover for ASA 5520 GNS3

Image
The above is a topology in GNS3 that is short and sweet. Two ASA's running 8.4 code and enabling failover.  I will post the configuration I did for failover of ASA's just to test it out. Links:  E1 - Outside Interface |  172.16.1.1 /24  |    E3 -  Failover Interface |  Primary 10.1.1.1 /24 | E3 - Failover Interface | Secondary 10.1.1.2 /24 | E2 - Outside Interface | 172.16.1.2 /24 |  Primary ASA Config: interface GigabitEthernet1  nameif outside  security-level 0  ip address 172.16.1.1 255.255.255.0 interface GigabitEthernet3  description LAN/STATE Failover Interface FAIL OVER CONFIG ---------------------------------------------- - failover failover lan unit primary  failover lan interface failover GigabitEthernet3 failover link failover GigabitEthernet3 failover interface ip failover 10.1.1.1 255.255.255.0 standby 10.1.1.2 Secondary ASA Config: interface GigabitEthernet1  nameif outside  security-

Cisco Tomcat High CPU Utilization 99 percent

Image
So a client was experience slow web interface usage to their calling node. As well RTMT was shooting off the alert. The alert is for Call Process CPU Node Pegging.  The culprit tomcat! Cisco Tomcat Service -  In enterprise edition this is a web server service. In the business edition (BE Servers) this uses the web server and unity utilizes the service as well. Log in to each call manager node and issue the following command: show process load cpu **OUTPUT** top - 08:55:48 up 340 days, 4:03, 1 user, load average: 4.64, 3.25, 2.98  Tasks: 142 total, 2 running, 140 sleeping, 0 stopped, 0 zombie  Cpu(s): 16.3%us, 3.4%sy, 0.0%ni, 80.1%id, 0.1%wa, 0.0%hi, 0.2%si, 0.0%st  Mem: 4016964k total, 3856400k used, 160564k free, 29904k buffers  Swap: 2064280k total, 1664k used, 2062616k free, 598124k cached  PID USER PR NI VIRT RES SHR S %CPU %MEM TIME+ COMMAND  8065 tomcat 25 0 2317m 1.9g 22m S 99.4 50.4 358084:37 tomcat  1 root 15 0 2172 684 584 S 0.0 0.0 9:12.24 init.real 

Adding Routes to Windows Box ( Static and Persistent Route)

Image
A client calls in and needs to have a route added to their network in order to be able get to the domain of a certain LAN. So in order to add a static route to a windows environment we will do the following: route add  < IP of Destination Network >  < Subnet Mask>  < Gateway> <Metric> For this example my destination will be 192.168.24.1 255.255.255.0 and gateway192.168.24.1 Adding a route via windows cmd prompt Now we can do a "route print" to see the routes on a windows machine: Now we see the route was added. However if we wanted to add this route as a PERSISTENT route  we would need to add the " -p " character in from of our IP's.  Persistent Route: route -p ADD <IP of Destionation Network> <SubnetMask>  <Gateway> <Metric>

CIPT2 Notes

Image
Quality Issues Availability Issues Dailplan Issues Nat and Security Issues Quality Issues Packet by packet delivery No guarantee for correct order RTP fills in gaps with sequence numbers Bandwidth shared by multiple users and applications Peaks and buffer queues Jitter Packet drops in case of buffer congestion ** When queue fills up packets are dropped so QoS needs to be implemented Quality Issues in multisite deployment generally are:  1. Buffer delays and packet drops  2. Bandwidth shared by multiple streams  3. Packets can be delivered out of sequence Bandwidth Issues All inter-site traffic ( voice data video) competing for availability Voice causes lots of overhead No unnecessary traffic should be sent over the IP WAN Voice Packet : Small size High Packet Rate Large Overhead Data Packet : Large Size Lower Packet Rate Small Overhead Availability Issues  - Signaling  - Media Tra

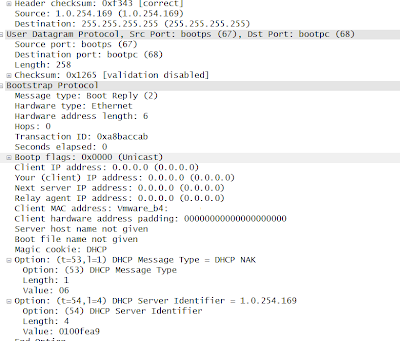
DHCP Reservation is slow / not working completely. ( 1.0.254.169 IP )

Image
One problem i found is the address 1.0.254.169 is an IP address that can cause many errors when trying to do DHCP reservations especially if you are within the same broadcast domain. 1.0.254.169 is the virtual DHCP server IP address of a tool called Himachi made by LogMeIn. When a computer was trying to lease an ip address it would either get 0.0.0.0 or no IP at all with "access denied". So to Wireshark we turn ! A live capture was done on one of the devices being affected by the issue. In the capture it was found the broadcast was sent out for DHCP through the correct gateways but the unicast response was sent back from 1.0.254.169. This virtual IP that responded was a Himachi LogMeIn machine that was running in the same VLAN with promiscuous mode turned on the NIC.  In order to fix this we turned off the Himachi Gateway and now we no longer are having the weird lease / reservation issues.

SCCP End Point Call State from a packet

So looking through trace logs and instead of researching each call state I wanted to have a nice list to look through calls with to know what the state number is referencing for SCCP Endpoints Example Call Trace: Trace 1: TcpHandle(TCPPid) = 0x(0349049) Device Name = CallState callState=1  - This call state means the call went "off-hook" or in essence the user picked up the phone to begin a call lineInstance=1 callReference=43744695 privacy=0 sccp_precedenceLv=4 precedenceDm=0 Trace 2:  TcpHandle(TCPPid) = 0x(0349049) Device Name =  CallState callState=12 - For the same call the device is now in state 12 or call proceeding. So the user has already dialed the number he would like to call.  lineInstance=1 callReference=43744695 privacy=0 sccp_precedenceLv=4 precedenceDm=0 Trace 3: TcpHandle(TCPPid) = 0x(0349049) Device Name =  CallState callState=5 - Call state 5 as we see means the call has now been connected lineIns

Enable SNMP WLC

Image
Enabling SNMP on network devices can help monitor devices and their health state. The current one I enabled SNMP for was a Wireless Lan Controller. First, Log in to the Wireless LAN Controller. You will see a login similar to the above. Next.... 1. Click Management ( **A new screen will load ) 2. Click SNMP              - You should see a menu drop down. Then click "communities" 3. Now when looking at the the above image you can see the highlighted items that are needed to be clicked in order to get where we are.  To the far right you should see a "New.."  button. Click the "New" button in order to create an SNMP string that we can monitor. In the above image we can see a new field to insert SNMP. For this we will do the following credentials. Community - testsnmp IP Address - 0.0.0.0 IP Mask - 0.0.0.0 Access Mode - Read Only Status - Enable After done click Apply (***can be found on the right upper corner) After clickli